
Steganography - Example
by Stephen Gillespiepublished on
This was written in 2010, so a lot has changed but the concepts here are still useful and also provide some understanding into the way file systems work.
Using Steganography to hide the JPEG image
For this exercise I used the program mp3stegz (Zaenuri, A., 17-5-2008). This is a free tool written using Delphi 7. The main reason for choosing this program was due to its ability to run under Wine on Ubuntu Linux. The mp3 file I chose as the host is “01-Hurricane.mp3” by Bob Dylan which can be seen highlighted in Figure 1 with the original size shown as 20,052KB.

Figure 1: File listing showing 01-Hurricane.mp3
The jpg file I hid is a picture of the newly developed John Deer 3120 Tractor which I intended to sell to a Chinese manufacturer. The image is named “IMG_3791-1.JPG” and is 11066KB in size (See Figure 2).

Figure 2. John Deer 3120 Tractor (IMG_3791-1.JPG)
After running mp3stegz, the program presented a dialogue where I selected my source image “IMG_3791-1.JPG” and the host file “01-Hurricane.mp3”. I created the steganographic image by pressing the “Hide it” button which in turn created a new mp3 file “01-Hurricane.mp3-steg.mp3” (See Figure 3). This file is exactly the same size as the original, but in order not to raise any suspicion I deleted the original and renamed the new file with the original file name.
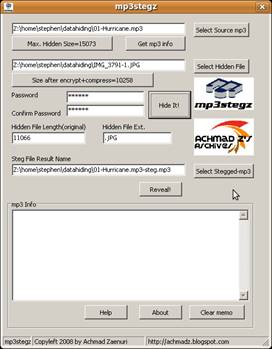
Figure 3. mp3stegz steganography program
The new file still looked unusual as the time stamp had changed, so I used the UNIX command touch to change the Modify, Access and Create (MAC) times for the file to be the same as the other songs from the same album. I used command “touch –r 02-Isis.mp3 01-Hurricane.mp3”, which uses another song, “02-Isis.mp3”, from the same album as a template for the MAC times. Figure 4 shows a file listing before and after the touch command was executed.
The altered “01-Hurricane.mp3” file could then be copied back to the USB drive. The accessed time would change but this should not raise the same level of suspicion as a change in the modify time.
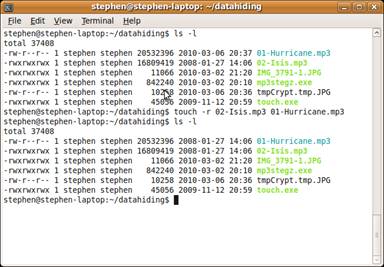
Figure 4. Using UNIX touch command to set MAC times.
Using unallocated sectors after the MBR to hide a Word document
In order to perform the remaining data hiding tasks, I created a copy of the USB flash disk using dd. This allowed me to work on a copy of the disk in the event I corrupted the disk while hiding the information as some of the actions could destroy the data on the disk if a mistake is made. See figure 5 below.

After backing up the USB flash disk I used the mmls command from The Sleuth Kit (TSK) (TSK, n.d.), which identified unallocated space from sector 2 to 62 as shown in figure 6.
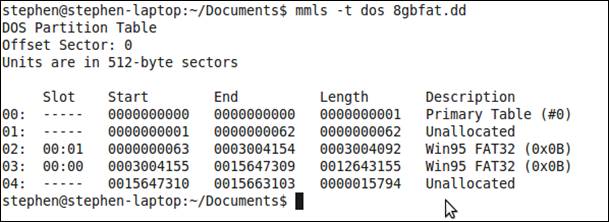
Figure 6. mmls output show disk usage.
Having identified the unallocated space, I stored my word document at the beginning of sector 10 (byte offset 5120). If the administrators used more sophisticated measures to analyse disks I would have moved the starting location away from a sector boundary such as 5234, as many tools only check for hidden files at boundaries in order to improve performance. I used the dd command in figure 7 to store the document at byte offset 5120 on the disk image using a block size of 1 (bs=1 which equals 1 byte) together with the seek option in order to start writing the file 5120 bytes from the start of image file. The option “conv=notrunc” instructs dd not to truncate the file after writing the data.

Figure 7. dd command to copy document to disk image
The screen dump from Winhex (X-ways,n.d.) in figure 8 shows the document starting at byte 5120. The Microsoft Word Document file signature, “D0 CF 11 E0”, can be seen at bytes 5120 to 5124.
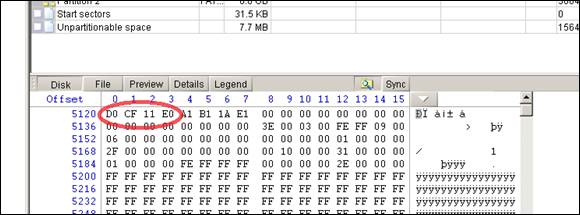
Figure 8. Winhex showing Word document starting at offset 5120
I tested the recovery of my document using the command shown in figure 9. The option “count=26624” instructs dd to copy only 26624 bytes, which is the size in bytes of the document, from the starting point set using the option “skip=5120”. This will skip 5120 bytes from the start of the image and copy the next 26624 bytes to the file specified after the option “of=”.

Fig 9. dd command to copy document from disk image
Hiding the PDF document by changing the file extension and signature
In order to hide the PDF document, I changed the extension to “mp3” and, using Winhex, altered the file signature from “25 50 44 46”, which identifies the file as a PDF document, to “49 44 33 03 00 00 00”, which is the identifier for an mp3 file. The circled sections of figures 10 and 11 show the file signatures before and after the change. This file will now look like any other mp3 file on the USB drive, but will not play. This could be explained away by saying that it must have been corrupted when copying it to the USB drive.
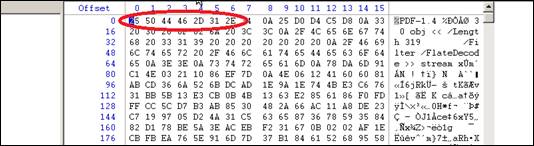
Figure 10. Hex dump showing file signature of PDF document.
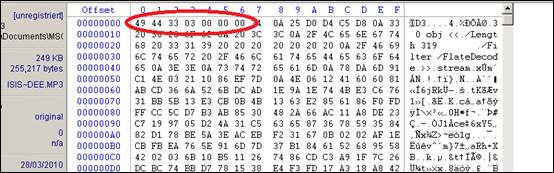
Figure 11. Hex dump of file showing signature changed to look like and mp3 file.
Hiding the spreadsheet in file slack space
The spreadsheet containing the costs for the new tractor is 3137 bytes in size, which means it should be possible to store this file on the slack space of another file, without fragmenting it, as the cluster size on the disk is 4096 bytes on the USB flash disk. As I required a file with a large percentage of the cluster to be unused to store the spreadsheet, I created a file which would consist of mostly slack space by only adding 8 bytes to the file. In order not to attract attention to this file I named it “log.tmp”. This would at first glance look like a log file left on the disk by some program.
The first step before hiding the spreadsheet in the file slack space was to identify the start location and size of the file using Winhex. Winhex shows the file starting at offset 19118772224 and is 8 bytes long (Figure 12). This allowed me to store the spreadsheet starting at location 1918772232. As the cluster size is 4096 bytes, this left 4088 bytes to store the spreadsheet which is larger than the 3137 bytes required.
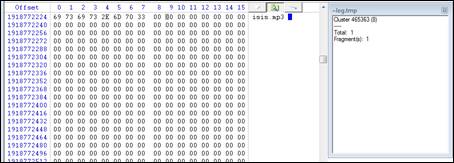
Figure 12. Hex dump showing slack space and cluster information.
As an added precaution before copying the spreadsheet into the slack space, I decided to perform a “left shift” operation using Winhex on each byte of the file first (Figure 13). This is a very basic form of encryption but should help avoid detection by data carving programs.
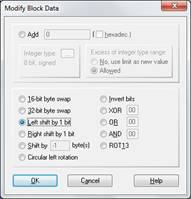
Figure 13. Winhex dialogue showing “left shift” option.
The final step was to use Winhex to copy the 3137 bytes of “JD 3120 costs.ods” to slack space of “log.tmp”. I started the paste operation at offset 1918772232, with the last byte occupying 1918775369. (See Figure 14)
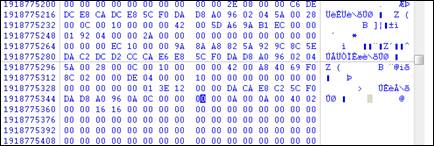
Figure 14. Winhex showing the cursor at end of the pasted data.
Hiding the email by deleting and marking the clusters used as bad
The first step in hiding the “email.txt” file, shown in figure 15, was to copy it to the USB disk and mark the file as deleted in order to stop it showing in a file listing. To ensure the file was not subsequently overwritten, I also identified the cluster where it was stored and marked this cluster as ‘bad’. This will stop Windows from overwriting the file on the disk. I can then recover the file at any time by accessing the disk directly using dd and creating a copy of the file which can be opened normally.
Figure 15. Email hidden by deleting and marking cluster as bad
Before I could mark the file as deleted and mark the cluster used by the “email.txt” file as bad, I needed to gather some information about the file using Winhex. The information I acquired was:
- File size: 1446 bytes
- Byte offset: 1891701760
- Cluster: 458754 – Offset from start of FAT1 is 1835016 (each cluster entry occupies 4 bytes for a FAT32 file system)
- Directory Entry: 299899712
Using Winhex I changed the first byte of the directory entry to E5 (See figure 16). This is how files are marked as deleted when using the FAT file system. Once a file is marked as deleted, the clusters allocated to it are available again for any new file being written to the disk.
Figure 16. Hex dump of cluster 458754 at offset 1835016
To prevent the cluster used by “email.txt” from being available, I changed the cluster value to “F7 FF FF 0F” (See figure 17). This is a special value which indicates the cluster has been marked as bad by the operating system. This could be interpreted by a forensic investigator as suspicious due to the fact that most disks today catch any problems before the operating system.
Figure 17. Hex dump of directory entry at offset 299899712
References:
TSK (n.d.) The Sleuth Kit (TSK). http://www.sleuthkit.org/ (accessed 28-4-2010)
X-ways (n.d.) Winhex Hexadecimal editor and disk editor. http://www.x-ways.net/winhex/ (accessed 24-04-2010)
Zaenuri, A. (17-5-2008) Hide any file inside mp3 file -- MP3 steganography.
http://achmadz.blogspot.com/2008/05/hide-any-file-inside-mp3-file.html (accessed 28-4-2010)